Official Luthiers Forum!

Owned and operated by Lance Kragenbrink
It is currently Thu Aug 21, 2025 12:58 pm


All times are UTC - 5 hours


Forum rules


Be nice, no cussin and enjoy!


Post new topic Reply to topic  [ 16 posts ] 
Author Message
PostPosted: Sun Nov 03, 2013 1:01 pm 
Offline
Contributing Member
Contributing Member
User avatar

Joined: Fri Jul 05, 2013 12:57 pm
Posts: 903
Location: London, England
Focus: Build
Status: Amateur
I've cut out a small maple rosette and the plan is to bind it with thin rosewood purfling strips.
I've done a test run or two and I'm not entirely convinced in my process.
Could someone suggest an appropriate method?

The strips are so thin they are liable snap at any moment and cutting them down do side is a bit haphazard. I was thinking of applying contact adhesive and just rolling the rosette along a strip like rolling a wheel down a road? Still doesn't help for the inside. I'd like something high tack as it seem to me that titebond will be a bit slow to stick.

Thanks in advance,
Nick


Top
 Profile  
 
PostPosted: Sun Nov 03, 2013 2:08 pm 
Offline
Koa
Koa

Joined: Thu Sep 10, 2009 4:01 pm
Posts: 1887
Location: UK
HHG really is the best for this sort of thing. You can coat both sides of the purfling which helps to prevent the strips from breaking (makes them more flexible) and it sizes the outside edge as well. Map pins do the rest. Alternately pre bend the strips on a bending iron and glue.


Top
 Profile  
 
PostPosted: Sun Nov 03, 2013 2:52 pm 
Offline
Koa
Koa
User avatar

Joined: Thu Feb 21, 2008 8:57 pm
Posts: 1982
Location: 8.33±0.35 kpc from Galactic center, 20 light-years above the equatorial in the Sol System
First name: duh
Last Name: Padma
City: Professional Sawdust Maker
Focus: Build
Gee, other than the sound hole, me never ever seen saw a non solid wood rosette,...well ok, ya there are the fake photo print rosettes and ones with all sorts of other material inlays, but yup, they was all pretty solid looking to me. laughing6-hehe

_________________
.

Audiences and dispensations on Thursdays ~ by appointment only.


.


Top
 Profile  
 
PostPosted: Sun Nov 03, 2013 3:02 pm 
Offline
Contributing Member
Contributing Member
User avatar

Joined: Mon Jun 18, 2012 10:04 pm
Posts: 184
First name: Robert
Last Name: Flindall
City: Peterborough
State: Ontario
Country: Canada
Focus: Build
Status: Amateur
Quote:
How about insert the maple ring in the soundboard, allow it to dry, then mill the inner and outer channels (thus getting nice, clean, uniform channels), and glue in the purfs?


Exactly how I do it. Works perfect every time.

_________________
Rob Flindall
Flindall Guitars
http://www.flindallguitars.com
https://www.facebook.com/FlindallGuitars


Top
 Profile  
 
PostPosted: Sun Nov 03, 2013 3:27 pm 
Offline
Contributing Member
Contributing Member
User avatar

Joined: Wed Oct 08, 2008 11:36 am
Posts: 7475
Location: Southeast US
City: Lenoir City
State: TN
Zip/Postal Code: 37772
Country: US
Focus: Repair
Rob Flindall wrote:
Quote:
How about insert the maple ring in the soundboard, allow it to dry, then mill the inner and outer channels (thus getting nice, clean, uniform channels), and glue in the purfs?


Exactly how I do it. Works perfect every time.


I'll jump on this bandwagon only to recommend you try it - works great!

_________________
Steve Smith
"Music is what feelings sound like"


Top
 Profile  
 
PostPosted: Sun Nov 03, 2013 4:18 pm 
Offline
Contributing Member
Contributing Member
User avatar

Joined: Fri Jul 05, 2013 12:57 pm
Posts: 903
Location: London, England
Focus: Build
Status: Amateur
Thanks for all the replies!

Maybe I'm showing my design naivety here but there are really thin strips, only very fine 0.5mm outlines around the rosette, matching the 0.5mm purfling outline on the inside of the binding (which will be glued to the binding and installed "as one").

They're to prevent bleed when I dye the top as much as they are for design, though of course I'm hoping they'll offer a subtle but definite distinction between the *purple* top (it's for a little girl!) and contrasting maple decoration.

To be honest, I probably should have bought 1mm rather than 0.5 but I think they'll still do their job. Just makes it difficult to rout a channel for them afterwards, otherwise I certainly would do as recommended by Todd and others.

As it is, I think Michael's suggestion is going to work best. The map pins trick was lurking somewhere in the depths of my memory! One more thing I won't have to ask again! :)

I don't have any HHG though, something I was saving for my next guitar... Will CA do? The rosette is only 1mm thick as I didn't like the idea of it being more than half the thickness of the top, so it's all a bit fiddly.

And, Padma, I knew it didn't sound quite right when I typed it but didn't take the time to think of better terminology! :)


Top
 Profile  
 
PostPosted: Sun Nov 03, 2013 4:44 pm 
Offline
Contributing Member
Contributing Member
User avatar

Joined: Fri Jan 22, 2010 9:59 pm
Posts: 3626
First name: Dennis
Last Name: Kincheloe
City: Kansas City
State: MO
Country: USA
Focus: Build
Status: Amateur
Nick Royle wrote:
I don't have any HHG though, something I was saving for my next guitar... Will CA do?

CA would work, but I can't see any advantage in it over titebond or any plain ol' glue for this job, and has the disadvantage of wicking all over the place and sticking to things you don't want it to.

So, I'd use the titebond. Cut a thin strip of masking tape and wrap it around the outside to clamp there. Pins will indeed work for the inside. And if the purfling strip is cut to perfect length, it should sort of self-clamp as long as you keep the ends butted together rather than overlapping.

Oh, and for the binding/purfling of the soundboard, I'd recommend against gluing them together, unless you've done that before without issue... for me, it's much easier to bend separately, and not much more difficult to glue simultaneously while installing. Do make the purfling full height, so you don't have to cut a separate channel.


Top
 Profile  
 
PostPosted: Sun Nov 03, 2013 5:18 pm 
Offline
Contributing Member
Contributing Member
User avatar

Joined: Fri Jul 05, 2013 12:57 pm
Posts: 903
Location: London, England
Focus: Build
Status: Amateur
Thanks, Dennis, I'll have a go at that in the morning. The butt joints are going to be tricky, I'd rather not have to cover them with the fretboard. Maybe inevitable?
And you're right, no real need to glue the purfling to the binding, I'll do as you suggest!

And thanks, Todd. I'll definitely use that advice in the future but my smallest bit is 1/32 and cutting the rosette was difficult enough with my rubbish circle cutter. I tried using my Stewmac jig for the first time and found it's no good for such small diameters, so I resorted to the dremel one, and it was a nightmare! It cut a spiral! eek 
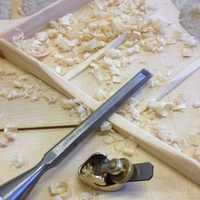
Anyway, in the end I used the popsicle stick method, and I'm likely to do the same when installing, at least for establishing the outline.

Cheers


Top
 Profile  
 
PostPosted: Sun Nov 03, 2013 5:19 pm 
Offline
Koa
Koa
User avatar

Joined: Thu Feb 21, 2008 8:57 pm
Posts: 1982
Location: 8.33±0.35 kpc from Galactic center, 20 light-years above the equatorial in the Sol System
First name: duh
Last Name: Padma
City: Professional Sawdust Maker
Focus: Build
Nick Royle wrote:
....

And, Padma, I knew it didn't sound quite right when I typed it but didn't take the time to think of better terminology! :)


Ah Nick our British friend...

As Milarepa once said...

"Do not think, do not act, do not meditate...leave your mind in its natural state."


Just look what this ancient Tibetan practice did for me. laughing6-hehe


blessings
duh ?adma

_________________
.

Audiences and dispensations on Thursdays ~ by appointment only.


.


Top
 Profile  
 
PostPosted: Sun Nov 03, 2013 5:33 pm 
Offline
Contributing Member
Contributing Member
User avatar

Joined: Fri Jul 05, 2013 12:57 pm
Posts: 903
Location: London, England
Focus: Build
Status: Amateur
the Padma wrote:

Just look what this ancient Tibetan practice did for me. laughing6-hehe


That's exactly what I'm worried about, mate! :lol:
My mind in its natural state is a highly chaotic, kaleidoscope-like place! Thinking is the only way to curb its erratic tendencies. wow7-eyes

I was once asked by a Tibetan monk how I keep so calm, so that shows how much they know! ;)


Top
 Profile  
 
PostPosted: Mon Nov 04, 2013 1:02 am 
Offline
Contributing Member
Contributing Member
User avatar

Joined: Wed Aug 12, 2009 1:13 am
Posts: 451
First name: Tim
Last Name: Allen
City: San Francisco
Focus: Build
Status: Amateur
Thanks, gusy, for the useful info in this thread.

For any Americans slightly puzzled: "map pins" is British for what we Americans call "push pins."


You do not have the required permissions to view the files attached to this post.

_________________
Tim Allen
"Never hurry, never rest."


Top
 Profile  
 
PostPosted: Mon Nov 04, 2013 2:30 am 
Offline
Koa
Koa

Joined: Thu Sep 10, 2009 4:01 pm
Posts: 1887
Location: UK
There was a time when you could buy much nicer all metal versions of the map pin. Perhaps you still can.
Sloane used these pins and built his entire rosette using them. I still use the technique for some rosettes. Some can have well over 30 lines. The advantage that HHG has is that it is easy to reconstitute the glue if the rosette doesn't turn out perfectly even. It rarely does. The disadvantage of using the pins is that the outer line can take the imprint of the metal pin. Either use a sacrificial waxed line or remove the indentations with hot water.


These users thanked the author Michael.N. for the post: Nick Royle (Tue Nov 05, 2013 8:16 am)
Top
 Profile  
 
PostPosted: Tue Nov 05, 2013 7:17 am 
Offline
Mahogany
Mahogany

Joined: Thu Feb 01, 2007 12:30 pm
Posts: 75
Another technique for rosettes:

When you cut the channels for your rosette in the top, also cut an identical channel in a piece of polyethylene (white cutting board material) before you change the radius of the cutter for your next cut. Keep repeating the cut in the poly each time you make a cut in the top.

This leaves you a perfectly identical channel in the poly to construct your rosette. You can play around to your heart's content getting the fit just right, while avoiding dinging up your top. Glue it all up in the poly and once dry, sand down the surface while still in the poly, and then pop it out. It will be an exact fit for the channel you cut in the top, and you just have one stable piece to have to mess with.

I always use thin CA for this as there are no swelling issues to have to deal with. If you happen to get carried away with the CA and the exothermic reaction goes into the "China Syndrome" of getting hot enough to boil leaving a white area, it hasn't happened glued into the top, so you can just pop it out and redue it in the poly.

You also don't have to mess with pins, "wobbles " from uneven pressure from the pinning up, waiting for glue to dry, etc.

Just fit it all dry, glue with thin CA, and pop it out of the polyethylene mold.

Where this really shines is with wider, complex multi-piece rosettes. You can arrange everything dry, and when perfect, drip CA on it. No racing the open time of the glue.


You do not have the required permissions to view the files attached to this post.


These users thanked the author RNRoberts for the post (total 3): mkellyvrod (Wed Nov 06, 2013 7:22 am) • jeff crisp (Tue Nov 05, 2013 9:36 pm) • Nick Royle (Tue Nov 05, 2013 8:16 am)
Top
 Profile  
 
PostPosted: Tue Nov 05, 2013 5:55 pm 
Offline
Contributing Member
Contributing Member
User avatar

Joined: Mon Jan 08, 2007 3:47 pm
Posts: 1213
Location: Raleigh, NC
First name: Ringo
Just a quick note to seal the top with something if using CA... it will wick in and stain spruce a nasty looking yellow.


These users thanked the author James Ringelspaugh for the post: Nick Royle (Tue Nov 05, 2013 6:11 pm)
Top
 Profile  
 
Display posts from previous:  Sort by  
Post new topic Reply to topic  [ 16 posts ] 

All times are UTC - 5 hours


Who is online

Users browsing this forum: CarlD and 18 guests


You cannot post new topics in this forum
You cannot reply to topics in this forum
You cannot edit your posts in this forum
You cannot delete your posts in this forum
You cannot post attachments in this forum

Jump to:  
Powered by phpBB® Forum Software © phpBB Group
phpBB customization services by 2by2host.com